
Using Task Adapter
- Intro
- Create an integration config
- Configure endpoints
- Field mappings
- Start exporting tasks
- Run export again to update tasks
- Automated (scheduled) export
Intro
TaskAdapter supports manual and scheduled (automated) integration between various bug tracking and project management systems, like Atlassian JIRA, Redmine, Trello, Microsoft Project and others.
TaskAdapter is a downloadable tool that you can run on premises - either on a local computer or some shared server.
Why this is a stand-alone tool and not SaaS
Once you start TaskAdapter using the script in the distributive, it will launch a TaskAdapter process and also
open TaskAdapter app in default web browser. Note that the process will continue to run even if you close
your browser. This allows running TaskAdapter in “server” mode with scheduled (automated) synchronization
that runs in background. You need to stop the *process if you want to completely stop TaskAdapter. This can be
done by pressing CTRL+C in the console window where you started the script.
Create an integration config
First you will create an “integration config”, which will connect two systems - Atlassian JIRA and Microsoft Project in this example. This config will keep settings like your JIRA server URL, credentials, Microsoft Project file location. It will also hold “field mappings”, which define what fields in one system are mapped to what fields in the other one.
More on fields mapping below.
Use “New Config” button on the main application page to create a new integration config. Select one of the required systems for integration (e.g. Atlassian JIRA).
Next page will allow you to either register this system in TaskAdapter (if this is the first time you are accessing it) or select a previously registered one (this way you don’t need to re-enter your JIRA url and credentials).
Then select the other required system (e.g. Microsoft Project). Similarly, register a new Microsoft Project file or select an existing one already known to TaskAdapter.
It does not matter which system you select first and which one - second. You will be able to transfer data in either direction.
Last step (optional) - provide a description for this integration. For example, “PROD JIRA - my project file”.
Once created, integration configs are stored in TaskAdapter data directory (<user home>/.taskadapter folder).
Sample page for an Atlassian JIRA and Microsoft Project integration config:
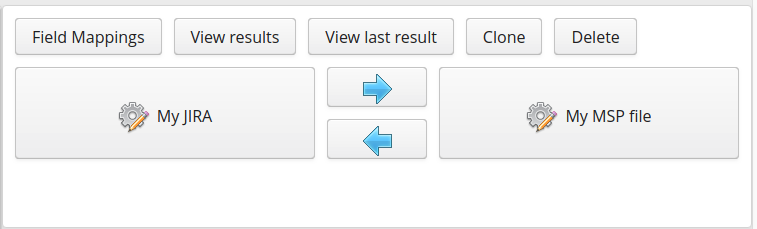
This page has two buttons to edit settings for these endpoints, two “start export” (arrow) buttons and “Field mappings” button.
Configure endpoints
Click one of these big buttons to configure Atlassian JIRA or Microsoft Project:
Field mappings
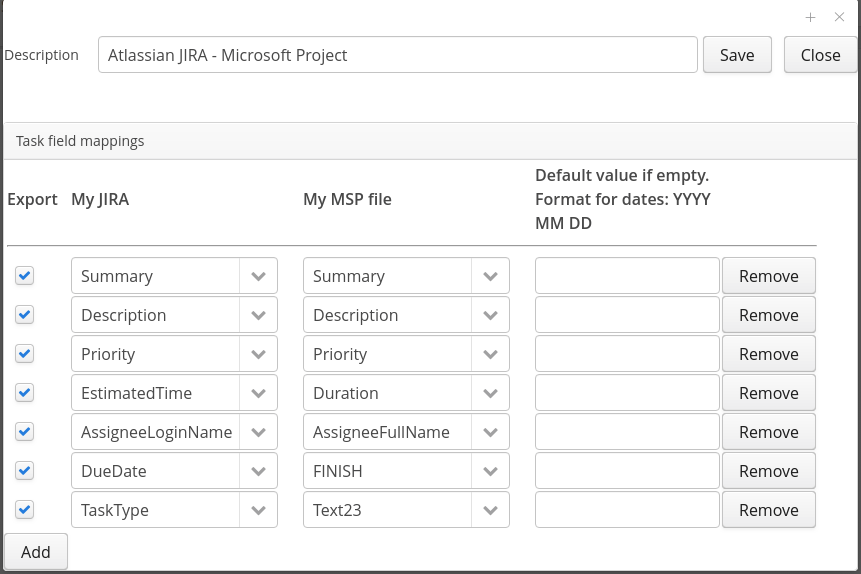
Click “Field mappings” button on “Config Summary” page to get “Field mapping” panel. This is the crucial part of the integration config: it defines 1. which task fields are exported and which ones are ignored 1. what is the relation between task fields in source and target systems
For example, you can map “Components” field in your source system to custom field (like “TEXT10”) in Microsoft Project since the latter does not support the concept of “Components”. Another example: JIRA’s “Due Date” field can be saved into either “Finish” or “Deadline” field in a Microsoft Project file - choose the mapping that you prefer. This flexible mappings mechanism was introduced in TaskAdapter v.3.
There are some very basic mapping validations performed by TaskAdapter, but you should
review field mappings to ensure they make sense for your use-case. E.g. mapping Summary field in JIRA to
Start On Date in Microsoft Project will most likely result in error during export.
Additional config validations are regularly introduced basing on user feedback.
You can unselect fields in this panel rather than delete them if you just want to temporary exclude them from export. Unselected fields will be ignored during the next manual or scheduled (automated) export.
Start exporting tasks
- Click arrow-buttons to start data export to the left or right system:

Once tasks are loaded from the source system, you will get a confirmation dialog where you can confirm or cancel export.
You can change fields mappings before the export.
Export results will be shown on the next page along with the number of tasks created and updated.
Run export again to update tasks
TaskAdapter remembers the tasks it previously created for this config. When you start export again,
it will check every loaded tasks against its data file and either create a new task in the destination system
or update an existing one if it was previously created by TaskAdapter.
Automated (scheduled) export
Once you verified that your integration works the way you want (field mappings make sense, etc), you can set up a scheduled job that will periodically perform export. This requires TaskAdapter application to be running. You don’t need to have TaskAdapter web application open in your browser, but the actual “server-side” process that
Go to Schedules page and create a new schedule for the required integration config.